Planning templates

Contents
Planning templates let you create planning models ahead of time and save them in the system. A planning template is created for a number of days and number of resources.
When the opportunity arises, this planning template is rolled out for the chosen period, specifying which resources are used.
This principle is used for example in a hospital environment: the schedules to be worked are planned ahead of time, together with the number of resources needed for a period of heat wave, for example.
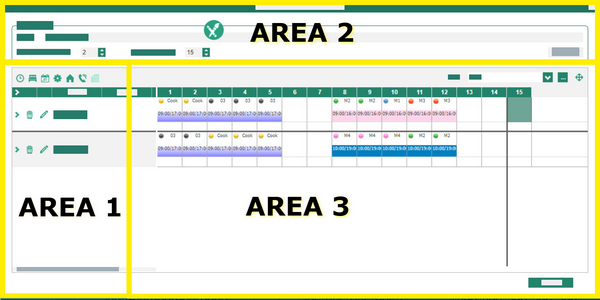
![]() Creating from an existing planning
Creating from an existing planning
To keep a planning completed in the resources planning to be reused for another period, you must: 1.Select the planning to be saved. Then, using the mouse, right click on the selection Create a planning template. 2.Area 1 lets you give a description to the planning template being created, specify the Number of models and the Number of days concerned. When the planning template is created from an existing planning, this data is recovered from the selected planning and can be modified. 3.Area 2 lists the resources needed. Click on the 4.Click on 5.Click on Validate to confirm modification of the resource. 6.Lastly, Area 3 copies the planning selected to create the planning template. Using the palette, modify the planning if needed. Various tabs are displayed in accordance with the enabled elements. Double click on a day to modify the Working periods and/or the Contracted time. The View of the planning can be adapted to your requirements.
7.Click Close to finish creating the planning template. 8.The screen that appears lists all planning templates saved. You can change their configuration by clicking on |

To create a planning template from scratch for the resources and the duration of your choice, you must: 1.Right click in the planning grid Create a planning template. 2.In Area 1, enter the Description desired, the Number of models desired and the Number of days for the planning. 3.In Area 2, click on 4.Click on Validate to confirm modification of the resource. 5.Lastly, in Area 3, use the palette to create your planning. Various tabs are displayed in accordance with the enabled elements. Double click on a day to modify the Working periods and/or the Contracted time. The View of the planning can be adapted to your requirements.
6.Click Close to finish creating the planning template. |
You can also use the palette. In this case, select planning template and model and assign them to the employees for the desired period. |
To modify a saved planning template, you must: 1.Right click in the planning grid Consult planning templates. 2.Double click on the planning template to be modified in the list of planning templates saved. 3.Make the desired modifications. 4.Click on Save, then on Close. |
To delete a saved planning template, you must: 1.Right click in the planning grid Consult planning templates. 2.Click on the planning template to be deleted in the list of planning templates saved. 3.Click on 4.Click on Close. |
See also: