You can define the content to be displayed in the planning cells to best suit your needs and to make the information displayed more legible. To do this, click on  at the very top right of the planing, then on .
 Modify the default customisation
You can select the elements you want to be displayed: Description, Abbreviation, Periods, Comments, Work cycle, Week resulting from work cycle, etc. You can also choose the order in which the elements are displayed using the  and and  arrows. If you deactivate all elements, the planning will display only colours/symbols. arrows. If you deactivate all elements, the planning will display only colours/symbols.
can be used to make the planning easier to read. They are available for the concepts Absences/Business leave, Remote working and Activities (optional).
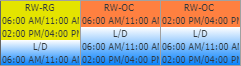
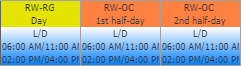
Remote working
|
Absences
|
Activities
|
|

|

|
Day remote working
|
Remote working 1st half-day
|
Remote working 2nd half-day
|
One-day absence
|
Absence 1st half-day
|
Absence 2nd half-day
|
Hour-to-hour absence
|
Duration absence
|
Day activity
|
Activity 1st half-day
|
Activity 2nd half-day
|
Duration activity
|
Hour-to-hour activity
|
Percentage activity
|
|

|

|
|
If the box is not checked, only the modified schedules will appear on the planning, helping you to find them more easily.
You can to allow you to circulate the planning without an end time of the day, for example. If you choose to do this, the time will be displayed as follows: **.**
1.Click on  to access setup. to access setup.
2.Define the Employee selection mode by checking Time contract or Work cycle.
3.Click on  in the bottom right-hand corner of the window. in the bottom right-hand corner of the window.
4.Select the time contract or work cycle in the dropdown menu.
5.Indicate whether you want to hide , the or the .
6..

|
Please note that this only concerns the display of the working periods of the schedules!
|
|
Here, you can select what data you want to be displayed for the tasks. The cost centres will be represented only by their colour/symbol (as chosen during setup.
You can use the simplified display for the activities.
|
Here, you can define what events you want to be displayed below each day, as well as the .
means that the comments made on a day in time management will be visible in the planning and vice versa.
means that the comments made from the planning will not be visible in time management.
|
Here, you can define what completed items (schedules, activities, attendances) you want to be displayed in your planning screen. A customisation window makes it possible for you to select various indicators which will be displayed using an icon or a colour (e.g. a late arrival or a clocking in a core window). You also have the option of hiding automatic clockings and the "Rest time respected" column for the employees concerned.
|
|
In order for the periods, comments and clients (optional) to be visible, either the size of the line must be increased (see below), or you must switch to extended mode on the employee.
|

|
You can let other managers benefit from this customisation and transmit it by clicking on  . You must then choose to which population it will apply. . You must then choose to which population it will apply.
If a customisation with the same description already exists, you can choose either to copy, which will create a new customisation, or to replace the existing one.
Once the planning is open for this population, other managers can choose to display your customisation.
|
|
Create a customisation
In order to achieve the display to which you are accustomed, you can create your own customisation.
1.Click on or  to copy an existing customisation. to copy an existing customisation.
2.Enter a .
3.Configure according to your requirements.
4. and the window.
|
You can let other managers benefit from this customisation and transmit it by clicking on . You must then choose to which population it will apply.
If a customisation with the same description already exists, you can choose either to copy, which will create a new customisation, or to replace the existing one.
Once the planning is open for this population, other managers can choose to display your customisation.
|
|
Adjust the size of cells
To make the planning easier to read, you can increase/reduce the column width or the line height.
1.Slide the mouse over the  icon to display the menu: icon to display the menu:
 Menu in day, half-day, morning, afternoon, night mode Menu in day, half-day, morning, afternoon, night mode Menu in hour mode Menu in hour mode
2.Click on one of the increase or decrease factors to reach the desired height and width.
For example, for a display by the 1/4 hour, click as many times as needed on  (Reduce the time scale) or on (Reduce the time scale) or on  (Increase the time scale) until the display suits you. (Increase the time scale) until the display suits you.
|
It is also possible to adopt the viewing mode that we will call Post mode to view resources planning by post and not by employee.
|
|
See also:
Management of comments
Customisation administration
