Modifying schedules and activities

Contents
In some cases, it is useful to change an employee's working hours to match changes in your schedules.
On the date-to-date view, you can make occasional modifications for each employee, proceeding as follows: 1.Activate the schedules 2.Double click or right click on the daily schedule to be modified. An option list is displayed on the screen. 3.Click on the Consult the schedule link which lets you access the details of the various working periods for the day selected. The working period breakdown window is displayed. It gives the graphic representation of the working periods (upper part), together with the different start and end times for each period. In this case, you can: •Change the Daily schedule of the employee for this day, via the dropdown menu or by clicking on •Use the arrows to reduce or increase the contracted time of the day. If From working periods is checked, the contracted time automatically reflects modifications made to working periods. •Modify the in and out times of Working periods or add some (creation of additional working periods).
4.Click on Save to confirm the information entered. The daily schedule is then modified according to the new information entered.
|


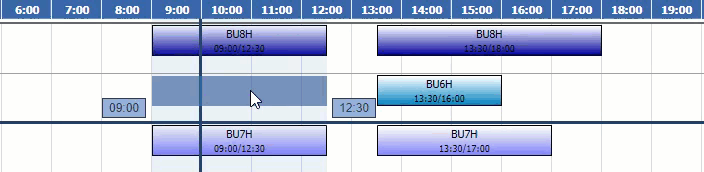
![]() Modifying an hour-by-hour schedule
Modifying an hour-by-hour schedule
|
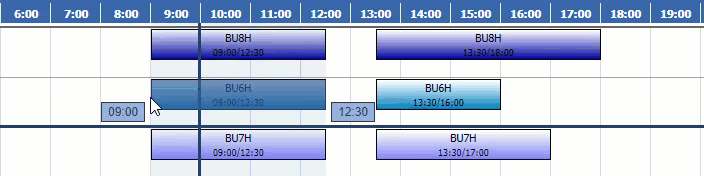
![]() Grouped modification of working periods
Grouped modification of working periods
When several employees are affected by a schedule change, it can be tedious to modify their working periods one by one. In order not to waste time, you can use the Mass modify working periods function. 1.Activate the schedules 2.Select one or more consecutive days (or portions of days) in the planning for one or more people, using drag and drop. 3.Right click Mass modify working periods. 4.Modify or add individuals via the 5.Select the dates concerned. 6.There are two possibilities: A.The same working periods: 1.Modify the in and out times of Working periods or add them (creating additional working periods). 2.Confirm. B.Different working periods: 1.Select the elements to be modified. 3.Either shift all periods by a certain number of hours. 4.Or shift certain periods only. 5.Confirm. |
On the date-to-date view, and with the Analytics option, you can make occasional modifications for each employee, proceeding as follows: 1.Activate the activities 2.Double click or right click on the activity to be modified. An option list is displayed on the screen. 3.Click on the Consult the activity link which lets you access the details of the various activities for the day selected. In this case, you can: •Modify the type of task, cost centre or client, using the button •Change the duration of the activity, the cost centre and the client •Add an activity by clicking on the button •Delete an activity by clicking on the
4. Click on Save to confirm the information entered. The activities are then modified according to the new information entered. |
On the date-to-date view, you can make occasional modifications for each employee, proceeding as follows: 1.Activate remote working 2.Double click or right click on the remote working type to be modified. An option list is displayed on the screen. 3.Click on the Consult the remote working file link which lets you access the details for the day selected. 4.Enter or modify the various parameters: •Remote working type •Remote working period •Comment •Time allocated per day of absence. 5.Save then Close. |
Copying and pasting enables you to copy planned periods (remote working schedules, absences and activities) in order to paste them to another period and possibly to other employees. To copy a planned period, you must:
1.Select one or more planned days for one or more employees in the planning grid. 2.Right-click on the selected period then click on Copy or use the Ctrl-C keys. 3.Click on the first day of the period to which you want to paste the planned schedules. 4.Right-click on the selected period then click on Paste or use the Ctrl-V keys.
In contrast to the dropper, copying the planned elements will take all of the elements present on the selected day(s). This means that if you want to copy only the schedules, you must disable all of the other elements on the toolbar. To check which elements are assigned to an employee, we recommend that you switch to extended mode, which will display all of the information. In this way, you may disable the elements that you do not wish to copy. When pasting, the elements that are already assigned to employees will be overwritten by the ones that you add. If you have disabled the absence display and the warning function is enabled, a message appears to inform you that you are planning an element on the day on which an absence has been requested.
To undo, you may use the Ctrl-Z keys or right-click on the grid and then on Delete. You may delete the data for one day or for the whole period selected. In this case, check the box at the very top right of the window to select all. |