Attendance screen

Contents
It is possible to view, modify, delete or add clockings for employees in the Kelio system. To do this, click on Time & Activities > Administrate > Manage > Attendance, then open the list of employees and select the employee you want.
You can:
•Consult the clockings/attendance indications for the week
•Consult the clockings/Attendance indications for the period
•Consult the clockings/attendance indications for groups
This screen displays all the clockings/notifications made by the employee or created by a system user. It is possible to directly select another employee from the drop-down list at the bottom of the screen or using the arrows on the right- and left-hand side of the screen.
This screen contains several columns:
 Week
Week
In this column you can find the week number, the dates of the week and the abbreviation of the schedule which is assigned to the selected employee. You can quickly change the week using the arrows. The system takes you directly to the current week but it is possible to go back several weeks using the vertical scrollbar. When you click on one of the boxes, the Schedule box at the bottom of the screen appears and you can then: 1.View the daily schedule for this period and modify it using the drop-down menu or by clicking on 2.Modify the in and out times of working periods or add them (creating additional working periods). 3.Use the arrows to reduce or increase the Contracted time of the day. 4.Force the Contracted time for the day by ticking on the corresponding box and selecting a specific number of hours. 5.Enter a comment in the Schedule comment tab (e.g. specify information about a post, a maintenance team visit, etc.) |
Presence
You have access to a customisable attendance table showing the different clockings In and Out, attendance notifications and attendance time declarations made by the employee for the period in question. Certain attendances appear with the logo Modifying an attendance: You can modify an attendance by clicking directly on the relevant attendance and entering the new time, by selecting it and clicking on The procedure to be followed is then the same as in the other screens, you must: 1.Select the attendance you wish to modify, then enter the new time/duration or click on 2.Enter the time/duration and potentially the type of clocked business leave or breaks. 3.Save then Close. Modification of an attendance is indicated by the Click on •Modified attendances •Actual attendances •Calculated attendances •Working periods •Terminal This allows you to easily compare the working periods and clockings performed, for example.
|


Absences/Business leave
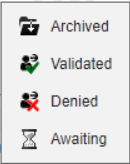
In this column, you can see the type abbreviation if the employee is absent or on business leave. Hover the cursor over it for more information. When you click on the type, the Absences/Business leave tab opens at the bottom of the screen. This gives you access to more details on the type, the period and the entry mode and you can consult the absence requests that have been approved, denied or are pending. This screen displays the elements from the absence schedule. |
Results
The Total (contracted/actual) and Balance columns provide the values of the various accounts created in the system according to each day's schedule. You can view: •Contr.: the contracted time for this day. •Actual: attendance time at the workstation (+ actual absences). •Paid: time paid for each day (different from actual time in case of absence, paid break, public holiday, etc.). •Normal: time paid less the day's overtime and/or special hours, if any. •Day balance: daily difference between the employee's contracted time and paid time. •Total balance: total difference between the contracted time and paid time. All these accounts are calculated in relation to the setup of the daily schedule. You are free to create new ones (overtime total, bonuses, absence total, etc.).
Using the A display rule per criterion can be implemented in order to automatically obtain relevant results adapted to the employee currently being managed. For example, for an employee with annualised hours, the annualisation results will appear; for a manager with a fixed daily rate, the number of days worked will be displayed. To do this, you just need to create customisations in accordance with 4 different criteria: •Attendance management mode •Time contract •Work cycle •Predefined fields For each display criterion, you can associate different customisations according to your needs. When viewing in grouped mode or if the employee does not match any of the criteria in the display rule, the default customisation applies.
|
Information
The One click on an icon provides details of the incident (type of anomaly, etc.) or the event (absence duration, type of bonus, etc.). You may select the information to be displayed using the |
Comment
In this column, you can add a comment about the day and/or view the comment from an attendance declaration. All you need to do is click on the
|
Below these columns you will find a number of different tabs; these will be activated when you click on an attendance element. This allows you to view the details without switching screen. These shortcuts are available for:
This tab provides you with a detailed schedule and allows you to change the schedule if necessary, using the same method as in Schedules. |
This tab allows you to create, modify, delete or view an absence type using the same method as in Absences/Business leave. |
This tab allows you to create, modify, delete or view an activity, a cost centre or a client using the same method as in Activities. |
This tab allows you to create, modify, delete or view the programmed remote working, as well as the current requests. 1.Go to the day for which you want to create a new remote working file. Remote working file2.Click on 3.Use the dropdown list to select the type that you wish to assign. 4.Indicate when you want the remote working to begin and end. 5.Return to remote working type from remote working cycle allows you to restore the default type when a type has been assigned by exception. Remote working request6.You will only see the checked requests for the selected day. 7.Send a reminder email/SMS to the validator(s) to notify the people concerned in case they have forgotten. 8.As a validator, you can validate/deny the request directly on this screen by selecting the status from the dropdown menu. 9.Save. |
In this tab, you can acknowledge an anomaly or send an alert using the same method as in Supervise. |
This tab enables you to understand the break time calculations once a Break window has been set up in the daily schedule. |
This tab allows you to create, modify, delete or view an addition/reduction using the same method as in Advanced functions. |
File runThis tab shows the transfer files that have been run during the course of the day. Run values can be modified on a case-by-case basis. The file values are accessed via the Processbutton and can be changed individually. A modified file is indicated by a In the event of an error, the Default values button reverts to the original calculation. Account transfer requestsThis tab shows the account transfer files requested by the employee, with the details for each file and the symbol corresponding to its status.
|
This tab shows the rules/extensions run on the selected day, with the details for each file and the symbol corresponding to its status. This function allows a user to easily distinguish the days that have already been processed from those that still need to be done. This check function is to be enabled for any rule. Rule creation/modification is done in the Rules/extensions menu reserved for Kelio consultants. You may then "check" the open rule using the Check button. Various information is shown on the screen: •The Description of the rule to make it easier to understand it. •The Detail of the rule, i.e. the calculation carried out. •Click on the
Four different options are available here: • • • • |
By clicking on the Period tab on the attendance screen you can toggle to the weekly view on a screen that displays all attendances for the period. By default, this period corresponds to the employee's payroll period.
You can easily change the period using the arrows on the left-hand side of the screen or by selecting the date to date display. With this display, you can view a maximum of 35 days.
It is possible to directly select another employee from the drop-down list at the bottom of the screen or by clicking on the blue arrows ![]() .
.
From this screen, you can access the same functions as from the weekly attendance screen (see Week tab).
The blue totals at the bottom of the screen correspond to the totals for the displayed period (payroll period or between two dates).
Attendance display customisation
When you click on the ![]() symbol, you can customise your attendance screen to show or hide:
symbol, you can customise your attendance screen to show or hide:
•The icon indicating that an attendance has been modified.
•The icon indicating an OTA clocking.
•The icon indicating an automatic attendance.
•The icon indicating a manual attendance.
•The icon indicating an attendance on the terminal.
•The time of automatic attendances, etc.